Implementing WebSockets in Go using Gorilla WebSocket
If you are building a standard CRUD application, suppose a to-do list, HTTP is all you need. The client asks the server for the data, the server provides it, and the transaction ends. It’s simple, stateless, and easy to scale.
But think what the case will be if we were to build a chatting application, the requirements are fundamentally different. When a client sends a message to a room in the server, every other client connected to that room must receive the message instantly.
If we tried to build this with standard HTTP, we would be forced into polling, essentially the client asks the server, “Do I have a new message?” every second. This is like calling your friend every 5 seconds asking if they have something to say. It wastes bandwidth, hammers your database and still introduces lag.
Long Polling vs Short Polling
See that term polling I have used in the last paragraph, there are two types of it.
Short Polling: The client will request data from the server, if the requested data is available the server will send it right away. If it’s not the server will return an empty response. The client will repeat this cycle at a regular interval simulating a real-time experience.
Long Polling: The client will request data from the server, if the requested data is available the server will send it right away, same as before. But if the data is not yet available to the server, the server will hold the connection alive until the data is available and then send it to the client. The cycle will repeat.
Introducing WebSockets
To solve this, we use WebSocket, standardized by IETF as RFC 6455 (https://www.rfc-editor.org/rfc/rfc6455). Unlike HTTP, which is a series of isolated letters sent back and forth, a WebSocket is more like a phone call. Once the connection is established (the “Handshake”), the line stays open. The server can push data to the client without the client asking for it.
This persistent, bi-directional communication is the backbone of every modern real-time system, from stock tickers to multiplayer games and of course chat applications, which we will be building today.
You may think of WebSockets as a completely separate protocol from HTTP, like FTP or SMTP. While true the data transmission is different, a WebSocket connection always starts its life as a standard HTTP request. This design choice ensures that WebSockets work over the existing HTTP port 80 and HTTPS port 443, bypassing most firewall rules that block non-web traffic. This also makes handling WebSocket connections with existing HTTP Proxy software such as Nginx or Apache much easier.
Suppose in our application we have an endpoint named /ws serving a WebSocket connection. How will our client software connect to it? We will not think about the code now, we want to know how the underlying system works first.
Our client will send a HTTP GET request to that endpoint with something like the format below:
1
2
3
4
5
6
GET /ws HTTP/1.1
Host: localhost:8080
Upgrade: websocket
Connection: Upgrade
Sec-WebSocket-Key: dGhlIHNhbXBsZSBub25jZQ==
Sec-WebSocket-Version: 13
Focus on the Connection: Upgrade & Upgrade: websocket, these two lines tell the server: “I don’t want a standard HTML response. I want to switch protocols”
The server will respond with something like this:
1
2
3
4
HTTP/1.1 101 Switching Protocols
Upgrade: websocket
Connection: Upgrade
Sec-WebSocket-Accept: s3pPLMBiTxaQ9kYGzzhZRbK+xOo=
Once the server sent back the 101 Switching Protocols, the HTTP protocol is effectively dead for this connection, but the underlying TCP connection stays open and the client and server can now start exchanging Binary Frames (https://en.wikipedia.org/wiki/WebSocket#Frame-based_message)
Something to note is that Sec-WebSocket-Key and Sec-WebSocket-Accept are intended to prevent a caching proxy from re-sending a previous WebSocket conversation, they do not provide any authentication or integrity. You must verify the authenticity of any incoming WebSocket connection yourself before accepting it, there are several well-adopted mechanisms for this such as using token or ticket based authentication. We will talk about it more later in this article.
Same-Origin Policy: WebSocket is designed to be compatible with HTTP, at least for the initial handshake. But it doesn’t mean that it comes with all the security considerations of HTTP. One such case is that WebSocket requests are not restricted by the same-origin policy. As a result, your WebSocket server must validate the Origin header during the connection establishment to avoid cross-site WebSocket attacks. There are live examples of vulnerabilities caused by this, better be safe.
Basic Example
Our goal in this series of articles is to create a functional chatting application with multiple channels and connected clients. But before we start working on that it’s better to write a basic program which will help us understand how to implement a WebSocket server in Go. While Go has a net/http library, the Gorilla WebSocket is a battle-tested, de-facto standard in the Go community. It handles the nitty-gritty of the WebSocket protocol, things like masking, fragmentation and control frames, so we don’t have to. Coder/WebSocket is also another great choice which we will use in the near future.
We will write a websocket echo program just to understand how the thing works.
First create a Go project, create a folder and run these commands in the terminal:
1
2
go mod init websocket-echo
go get github.com/gorilla/websocket
As you know, these will create a go module for us to work with, lets create a main.go file and write a basic starter application.
main.go:
1
2
3
4
5
6
7
8
9
10
11
12
13
14
15
16
17
18
19
package main

import (
  "log"
  "net/http"
)

func handleIndexFunc(w http.ResponseWriter, r *http.Request) {
    w.WriteHeader(http.StatusOK)
    w.Write([]byte("Hello, World!"))
}

func main() {
    http.HandleFunc("/", handleIndexFunc)
    log.Println("Starting server on :8080")
    if err := http.ListenAndServe(":8080", nil); err != nil {
        log.Fatalf("Could not start server: %s\n", err.Error())
    }
}
As you are working with WebSockets, I will assume that you have a working understanding of Go, so I will not explain the basics. What we are doing here is using the default HTTP Handler to create an endpoint / and creating a handleIndexFunc function to handle that endpoint. The function will return HTTP 200 (because we are writing http.StatusOK in the response header) and the text Hello, World! as the body.
Lets run it.
1
2
$ go run main.go
Starting server on :8080
Now if we hit the address http://127.0.0.1:8080 we will get the text Hello, World! as a response.
This is a basic HTTP endpoint, and our starting point. We will now make our way through implementing websockets.
Note the line http.HandleFunc("/", handleIndexFunc), we are not specifying the HTTP method here, as a result this function will respond to every HTTP METHOD in existence. If we want to specify a method we can write it like this http.HandleFunc("GET /", handleIndexFunc), this will assign the function to only the HTTP GET method.
Our program so far has one endpoint, an HTTP one, we are not here for that, so lets get started with implementing WebSocket.
The first thing we will need for serving a WebSocket endpoint is an upgrader. What is an upgrader you might ask? Remember how WebSocket starts its life by being a simple HTTP connection and then upgrades itself to WebSocket? The upgrader is responsible for the upgrade, Who would have thunk? In a general sense it validates the HTTP requests, checks if it contains all the necessary headers, calculates the Sec-WebSocket-Accept parameter and returns with 101 Switching Protocols if everything succeeds.
1
2
3
4
var websocketUpgrader = websocket.Upgrader{
    ReadBufferSize: 1024,
    WriteBufferSize: 1024,
}
ReadBufferSize and WriteBufferSize are the size of the memory buffer used for, well, Reading and Writing to/from the network. We are allocating 1KB of memory for the incoming and outgoing data. Keep it in mind that having a buffer of 1KB doesn’t mean we can’t read/write above this limit, it will just process the message as 1KB chunks. Another thing is that this buffer is allocated for each user, meaning if we have 100,000 connected users, the buffers alone would consume about 200MB of RAM (100k * 2KB).
Remember what we read about websocket doesn’t automatically enforce the check-origin policy? We need to implement that in the upgrader. For development purposes we will just return true which will allow connections from all origins.
1
2
3
4
5
6
7
var websocketUpgrader = websocket.Upgrader{
    ReadBufferSize: 1024,
    WriteBufferSize: 1024,
    CheckOrigin: func(r *http.Request) bool {
        return true
    },
}
Our upgrader is done, now we will create a handler function for the websocket.
1
2
3
4
5
6
7
8
9
10
11
12
13
14
15
16
17
18
19
20
21
22
23
24
25
26
27
28
29
30
31
32
33
34
35
package main

import (
    "log"
    "net/http"

    "github.com/gorilla/websocket"
)

var websocketUpgrader = websocket.Upgrader{
    ReadBufferSize:  1024,
    WriteBufferSize: 1024,
    CheckOrigin: func(r *http.Request) bool {
        return true
    },
}

func handleWebSocketFunc(w http.ResponseWriter, r *http.Request) {

}

func handleIndexFunc(w http.ResponseWriter, r *http.Request) {
    w.WriteHeader(http.StatusOK)
    w.Write([]byte("Hello, World!"))
}

func main() {
    http.HandleFunc("GET /", handleIndexFunc)
    http.HandleFunc("GET /ws", handleWebSocketFunc)

    log.Println("Starting server on :8080")
    if err := http.ListenAndServe(":8080", nil); err != nil {
        log.Fatalf("Could not start server: %s\n", err.Error())
    }
}
The websocket handler has the same function signature as any other HTTP handler, because up until now it’s just another regular HTTP connection, nothing else.
Now we will use our upgrader and try to upgrade our regular HTTP connection to a websocket one.
1
2
3
4
5
6
7
8
9
func handleWebSocketFunc(w http.ResponseWriter, r *http.Request) {
    conn, err := websocketUpgrader.Upgrade(w, r, nil)
    if err != nil {
        log.Printf("WebSocket upgrade error: %s\n", err.Error())
        return
    }

    log.Println("WebSocket connection established")
}
The upgrader takes three arguments, the response object, request object, and a header, which we are passing nil. The header can be used to set cookies.
If we omit the conn variable and run the code, we will be able to connect to our /ws endpoint by using any API Client software such as Postman.
Let’s try it, here is the full main.go code.
1
2
3
4
5
6
7
8
9
10
11
12
13
14
15
16
17
18
19
20
21
22
23
24
25
26
27
28
29
30
31
32
33
34
35
36
37
38
39
package main

import (
    "log"
    "net/http"
    "github.com/gorilla/websocket"
)

var websocketUpgrader = websocket.Upgrader{
    ReadBufferSize:  1024,
    WriteBufferSize: 1024,
    CheckOrigin: func(r *http.Request) bool {
        return true
    },
}

func handleWebSocketFunc(w http.ResponseWriter, r *http.Request) {
    _, err := websocketUpgrader.Upgrade(w, r, nil)
    if err != nil {
        log.Printf("WebSocket upgrade error: %s\n", err.Error())
        return
    }
    log.Println("WebSocket connection established")
}

func handleIndexFunc(w http.ResponseWriter, r *http.Request) {
    w.WriteHeader(http.StatusOK)
    w.Write([]byte("Hello, World!"))
}

func main() {
    http.HandleFunc("GET /", handleIndexFunc)
    http.HandleFunc("GET /ws", handleWebSocketFunc)

    log.Println("Starting server on :8080")
    if err := http.ListenAndServe(":8080", nil); err != nil {
        log.Fatalf("Could not start server: %s\n", err.Error())
    }
}
Run it and connect to ws://127.0.0.1:8080/ws from any websocket supported client and you will be greeted with a successful connection like below.
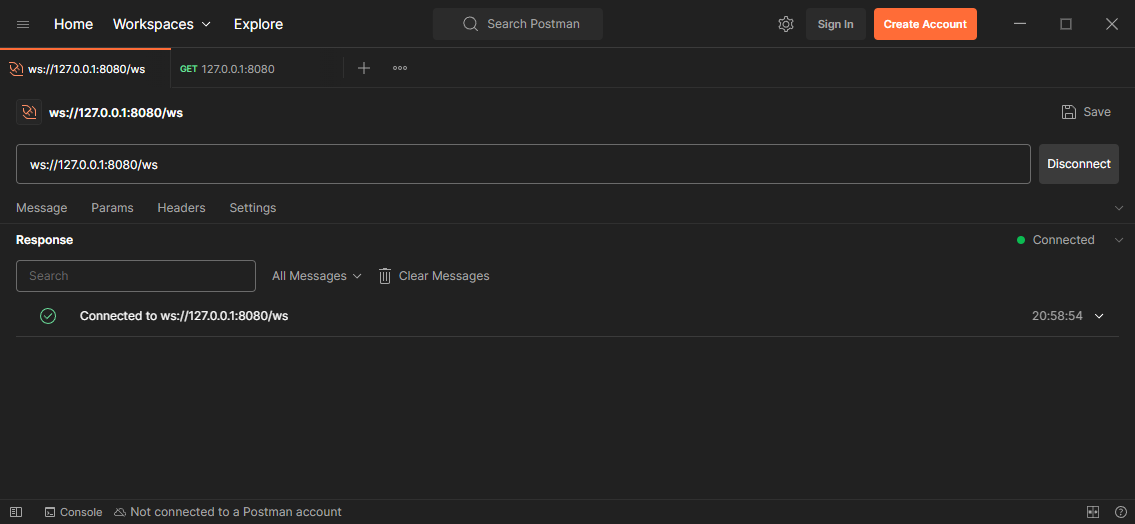 Successfully Connected to the WS endpoint
1
2
3
$ go run main.go
2025/11/29 20:55:57 Starting server on :8080
2025/11/29 20:58:54 WebSocket connection established
Our websocket endpoint is serving, but you will find quickly that we can’t send any message to it, how will we, we didn’t implement any mechanism for it yet. Let’s do it now.
Be aware that what we are going to do now is in no way the appropriate way to do this, but for now it will do. We are still learning about websocket aren’t we?
Inside the handleWebSocketFunc add an infinite loop, we will read the websocket messages inside this loop and send it back to the client.
1
2
3
4
5
6
7
8
9
10
11
12
13
func handleWebSocketFunc(w http.ResponseWriter, r *http.Request) {
    conn, err := websocketUpgrader.Upgrade(w, r, nil)
    if err != nil {
        log.Printf("WebSocket upgrade error: %s\n", err.Error())
        return
    }

    log.Println("WebSocket connection established")

    for {

    }
}
Inside the loop we will read the incoming message from the websocket connection and print it along with it’s type.
1
2
3
4
5
6
7
8
9
10
    for {
        messageType, message, err := conn.ReadMessage()
        if err != nil {
            log.Println("Read error:", err)
            break
        }

        log.Printf("Received Message Bytes: %s", message)
        log.Printf("Received Message Type: %d", messageType)
    }
Now run the code, connect to the websocket endpoint from a client and send a message. I am sending a message with the body “hello” to the websocket connection, and here is the terminal output.
1
2
3
4
5
$ go run main.go
2025/11/29 21:34:23 Starting server on :8080
2025/11/29 21:34:30 WebSocket connection established
2025/11/29 21:34:49 Received Message Bytes: hello
2025/11/29 21:34:49 Received Message Type: 1
There’s our message, at last. But, what is this message type thing? This message type is mentioned in the RFC, there are several types such as:
1
2
3
4
1 => Text
2 => Binary
9 => Ping
10 => Pong
We have a message type called Binary, even though we mainly use websockets to send JSON messages the underlying protocol is much smarter than that, it can also be used to transmit binary data. Websockets also uses a Ping/Pong mechanism to check the status of the connection, we will use this method to check if a client is still connected or not in the later part.
We can now read messages from our websockets connection, now we will write to it. Writing is easy. We can simply call the conn.WriteMessage(mt, message) method to write to our active websocket connection and the connected client will receive this message instantly. Let’s use this function to echo back the message we received.
Write this code inside the loop,
1
2
3
4
5
6
7
8
9
echoMessage := append([]byte("Echo: "), message...)

err = conn.WriteMessage(messageType, echoMessage)
if err != nil {
    log.Println("Write error:", err)
    break
}

log.Printf("Sent Message Bytes: %s", message)
We are appending the text “Echo: “ before our received message and writing it to the websocket. Run the code and connect to the ws endpoint and send a message, the message will be echoed back to the client.
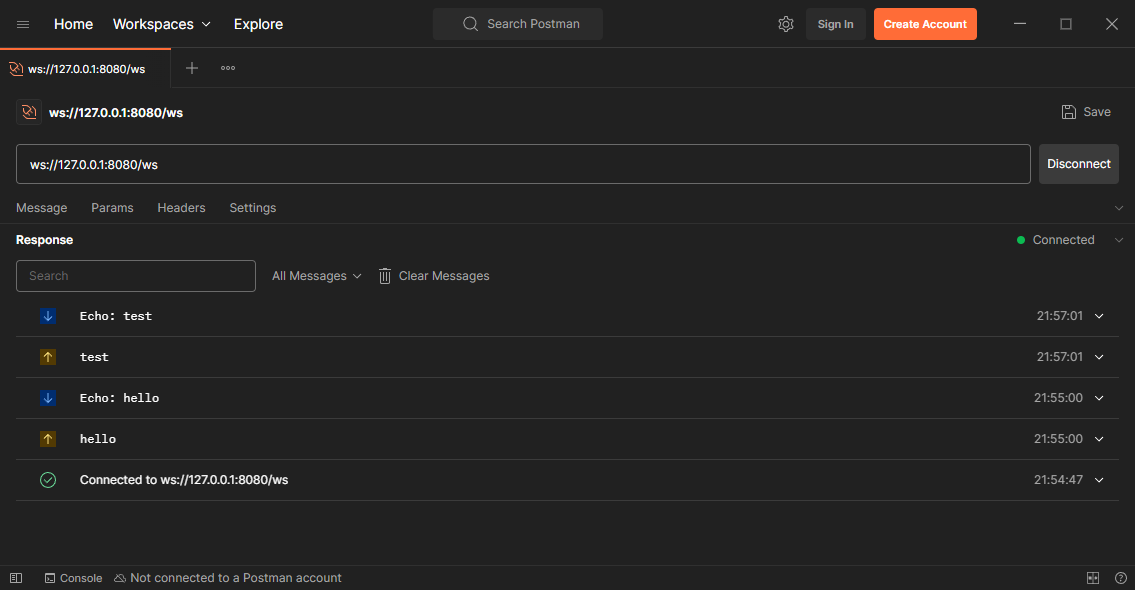 WebSockets Echo Program
So we successfully built our echo example, here is the complete main.go code, I will suggest you go over everything and make sure you understand it all. In the next chapter we will start to implement a functional chatting program with multiple channels and clients.
1
2
3
4
5
6
7
8
9
10
11
12
13
14
15
16
17
18
19
20
21
22
23
24
25
26
27
28
29
30
31
32
33
34
35
36
37
38
39
40
41
42
43
44
45
46
47
48
49
50
51
52
53
54
55
56
57
58
59
60
61
62
63
64
package main

import (
    "log"
    "net/http"
    "github.com/gorilla/websocket"
)

var websocketUpgrader = websocket.Upgrader{
    ReadBufferSize:  1024,
    WriteBufferSize: 1024,
    CheckOrigin: func(r *http.Request) bool {
        return true
    },
}

func handleWebSocketFunc(w http.ResponseWriter, r *http.Request) {
    conn, err := websocketUpgrader.Upgrade(w, r, nil)

    if err != nil {
        log.Printf("WebSocket upgrade error: %s\n", err.Error())
        return
    }

    defer conn.Close()

    log.Println("WebSocket connection established")

    for {
        messageType, message, err := conn.ReadMessage()
        if err != nil {
            log.Println("Read error:", err)
            break
        }

        log.Printf("Received Message Bytes: %s", message)
        log.Printf("Received Message Type: %d", messageType)

        echoMessage := append([]byte("Echo: "), message...)

        err = conn.WriteMessage(messageType, echoMessage)
        if err != nil {
            log.Println("Write error:", err)
            break
        }

        log.Printf("Sent Message Bytes: %s", message)
    }
}

func handleIndexFunc(w http.ResponseWriter, r *http.Request) {
    w.WriteHeader(http.StatusOK)
    w.Write([]byte("Hello, World!"))
}

func main() {
    http.HandleFunc("GET /", handleIndexFunc)
    http.HandleFunc("GET /ws", handleWebSocketFunc)

    log.Println("Starting server on :8080")
    if err := http.ListenAndServe(":8080", nil); err != nil {
        log.Fatalf("Could not start server: %s\n", err.Error())
    }
}
Conclusion
We didn’t build something meaningful yet, but we have learned the basics of implementing a websocket server in Go using Gorilla WebSocket. In the next chapter we will start building a functional chatting application with multiple channels and clients. Until then happy coding.